

[ad_1]
If you’re unfamiliar with the UX design process, those two little letters might seem confusing. But no matter whether you’re a career designer or a business manager who wants to get more hands-on with the design process, understanding how UX works can be crucial to a business. So if you’re keen to learn more, then you’ll need a practical answer to the question, “what is the UX design process?”
Below, we explain the UX design process from start to finish. We break it down into 5 basic steps, so you can follow along and apply them to your project. But first, let’s start with a general overview of what UX design is and why it helps.
What is UX design?
—
UX stands for “user experience,” and refers to designing a product in a way that’s comfortable, intuitive and fun for the user. The user experience itself reflects how the user feels when interacting with your product with each click and glance—is it a good experience or a bad experience?
UX design principles revolve around the user’s convenience, such as having the key buttons easily accessible or using animated icons to help users notice some things. By and large, UX design concerns itself with the minutiae of digital design, including design details like color and size, plus more general details like copywriting and information architecture (how users navigate your product). These details all add up to how much enjoyment (or frustration) the user feels when using the product; in other words, their experience.
Why is UX design so important? UX design anticipates your users’ needs and interests before they even log in, making your site or app more attuned to their specific preferences. Sure, each user is unique, but most products have a target audience that tends to behave uniformly, such as “tech-savvy females 18-26.” If you can cater your visuals and interface to the way they want, especially the fine details, they’ll enjoy and appreciate your product that much more.
So how can you make the UX design process work for you? What is the UX design process in concrete terms? Below, we list the 5 main steps of the typical UX design process so you can follow along for your own projects.
Step 1: pre-planning
—
Because the UX design process is so focused on the user, your first step should be identifying who those users are. Who is your target audience and what kind of user experience do they want? The more you hone in on a target audience, the better you’ll be able to cater to their individual tastes.
Normally, this is dictated by the product and business model. You can reference the customer demographics of your previous business data, or if you’re a new company, you can research some studies or data from similar companies. Site statistics like who’s spending time on your site and who’s bouncing can shed some light on who is most interested in your products.
For one thing, identifying your target users gives you insight into the best visual designs, such as which color schemes resonate most with those users, or which art style would they like to see for icons. But your target users also determine the site’s usability, such as the order they choose to complete tasks or how they use the navigation (i.e., menu categories vs. search bar).

Once you know your target audience, you can begin to prioritize your product’s tasks. The most important tasks for your users should be the most accessible, so a large part of UX design is making the top tasks the most convenient.
When it comes to actually designing, there are times when you must decide which tasks to promote over others. Having a solid list of the most-to-least important tasks can help you—and everyone on your team—stay organized and not lose track of the end goal.
So take a minute to make a quick list of all the tasks and functions you want your product to do, and then prioritize them in order of significance. Determine priority by what your target audience wants most—why are they using your product in the first place. Your business model will factor in, such as what features your product offer that your competitors don’t, but the most important factor is what tasks your target audience wants to complete.
The main purposes of your product will of course take precedence over the secondary and less-used tasks. For example, if you’re designing a calendar app, scheduling and organizing appointments should be a higher priority than logging in or changing the in-app preferences.
Step 2: planning
—
If step 1 is about answering the big picture questions, step 2 is about the details. You already know whom you’re targeting and which tasks to prioritize, so now it’s time to deep dive into what your users want and how to make your top tasks easier.
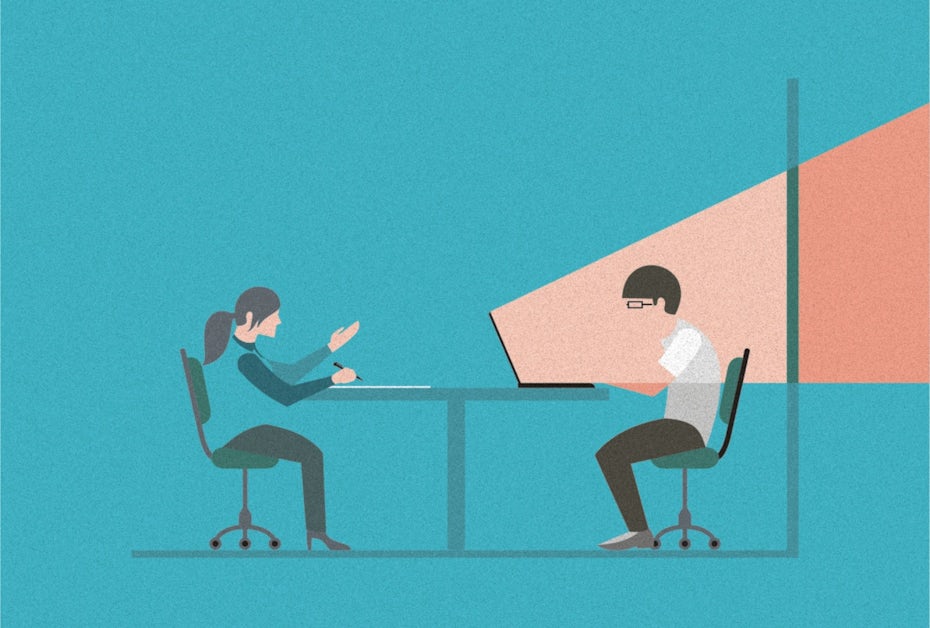
First and foremost, you want to understand your target audience: what they want, what they don’t want and what they’re hoping to gain from your product. Guessing and relying on instinct can only get you so far, so we recommend conducting early user tests to collect concrete, irrefutable data on what your users want.
Traditionally, focus groups have solved this problem, but focus groups come with all sorts of problems: they can be expensive and time-consuming, not to mention the results can be corrupted by the way it’s run or if participants don’t give their honest opinion for whatever reason. Conducting surveys online or scheduling one-on-one interviews with representatives of your target users produces better results, and you can handle these remotely and more conveniently than focus groups.
You’ll be user testing regularly at different points during the UX design process, but for now, you want to focus on the most relevant topics for the beginning. Specifically, you want to get into user pain points, usage preferences and which features your user group looks for. It’s also good to glean what you can about visual preferences, such as color schemes or art styles.
Although optional, it’s helpful to use your user data and create user personas, which are imaginary people you create to represent your actual users during the UX design process. Personas are aggregates of all your user data so that you can reference them when you’re designing to find the best choice.
One of the most important early user tests is for information architecture, so you can predict how people want to move around your site or app. The card sorting test involves writing all your page or topic categories on a card and having your participants organize them into umbrella categories based on what they think is natural. Tree testing is the flip side, where you test an already existing site or app structure and see if users can find what they’re looking for.
Once your initial testing is complete, you’re ready to plan out a “blueprint” of your product. You don’t have to worry about the details just yet, but for now, create a basic outline of how you want your site or app to be. Specifically, decide on the total number of pages or screens and a final information architecture (in other words, a site map).
It can help you visualize the final product by drawing rudimentary sketches, but that’s not necessary.
Finally, it pays to look into current UX design trends to see what’s popular at the moment. You won’t want to incorporate all those trends since different types of users have different tastes, but some of them might inspire you.
Step 3: wireframing
—
Wireframing is a very basic, but still usable, early version of your site or app. It gets its name from bare-boned visuals: with no proper graphics or finalized text copy, wireframes use empty boxes as placeholders for images and buttons to be added later.

Wireframes are a good time to start incorporating the customer journey map, a complementary document that predicts what the user will do with your product and how they will feel doing it. Check out the linked article for more details and instructions on how to create one yourself.
Don’t work too hard on your wireframe; they’re supposed to be basic so you can easily change what’s not working. Wireframes are essentially just a collection of placeholders that you can rearrange until you find the perfect configuration, so details like coloring, animations, or even text are unnecessary.
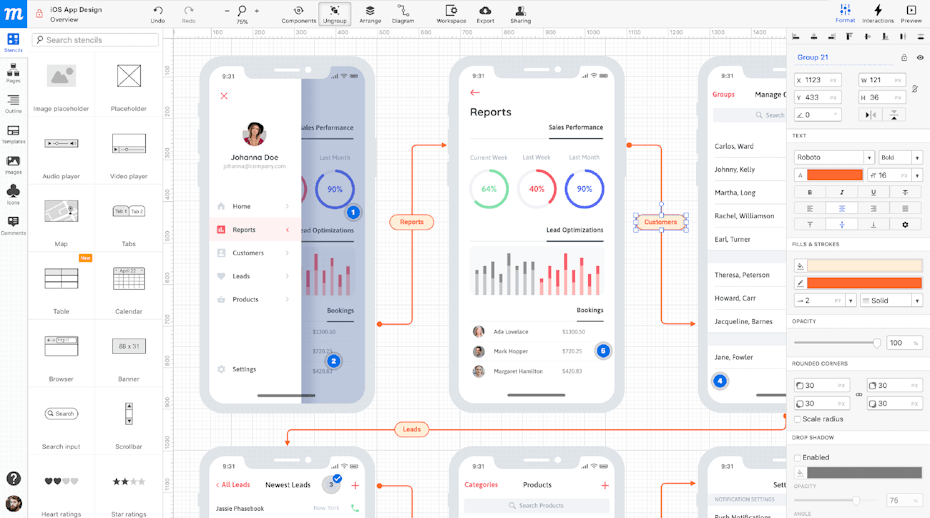
Wireframes don’t need to be digital—in the early stages of the UX design process, wireframes are often quick pen-and-paper doodles to help the designers organize their thoughts. In fact, UX sketching works amazingly as a way to outline your vision and test certain concepts before building them. Digital wireframes are more effective though, especially the ones with interactivity so that you can test your preliminary UX design.
If you have an interactive digital wireframe, it’s a good idea to test it with actual users. One rule of thumb in the UX design process is to test often, at least once per iteration. Testing the wireframe won’t give you insight into graphics or general enjoyment, but it can highlight early problems in the structure, usability and basic test flow.
To build an interactive wireframe, you need to choose the right UX software. AdobeXD, Moqups and Lucidchart are some popular choices.
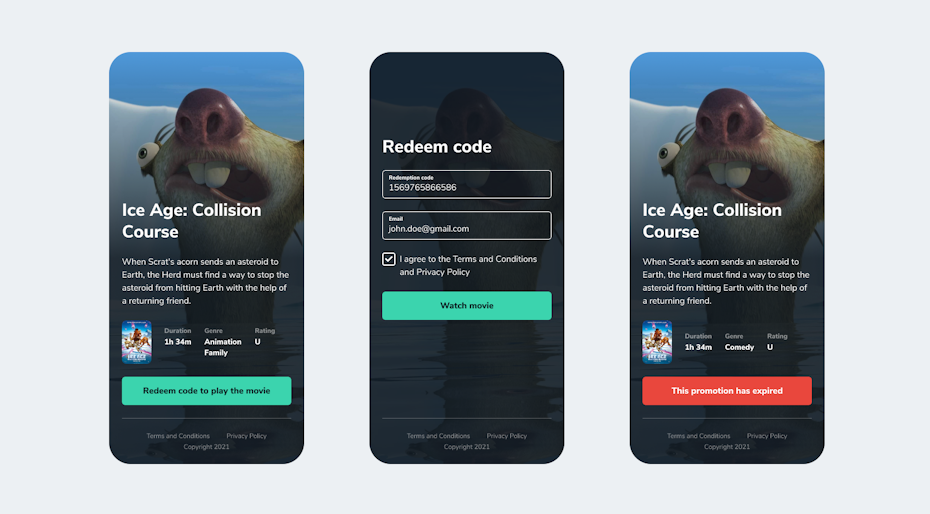
At this step, you might also consider making a mockup, which is a static visual document that shows what the finished product should look like. Mockups are harder to create since you have to finalize decisions on color, texture, graphic sizes and composition, but on the bright side, they don’t have to be interactive because they’re just for visuals.
Mockups are useful for showing stakeholders, but they’re completely optional. Your main goal at this stage is solidifying the basic usability; it’s best to get that settled now because those core functions are difficult to change later.
Step 4: prototyping
—
A prototype in the UX design process serves the same purpose as other industries: an early version of the product used primarily for testing and troubleshooting. Your digital prototype shows how users interact with your product and reveals any problems you haven’t anticipated.
Prototypes are just higher fidelity wireframes. By now you’re ready to fill in all those placeholders with actual graphics and text copy, creating an early and most functional version of the product. While wireframes test the basics like navigation and organization, prototypes test the specifics, including visuals and high-performance tasks that require multiple steps in a specific order.
Keep in mind that you can have multiple prototypes, each one advancing what the previous one started. In fact, the recommended work cycle is to create a prototype, test it and then incorporate the feedback into a newer and better prototype. You can repeat this cycle as much as necessary until you have a successful prototype that receives little criticism.
When it comes to the UX design process, prototypes are made for testing. You’ll want to get as much feedback and user data as possible, to ensure all the problems are fixed before the public release. Prototypes are also useful for experimenting with different visual designs and styles; if your budget allows, create multiple prototypes with different color schemes or graphics to see which your users prefer.
Conducting user tests can be draining for both time and money. To help expedite the process, you can use paid user testing sites like UserTesting or TestingTime, which can find your target users and collect the data for you—although you still need to design the prototypes yourself.
Step 5: finalize
—
The final stages of the UX design process are some of the simplest—at least they are if you’re been testing and fixing the previous problems as you progress. By the end, there’s not much to do except fix the bugs and test any last-minute additions.
After some final user tests, you’ll be able to iron out the remaining wrinkles. If the product still has some issues but you don’t want to postpone the launch, you can release a beta and alpha version of your product while you fix the last errors, as long as the core functionality works.
There’s a lot to be said about marketing and publicizing your launch, but those topics fall outside of the proper UX design process. Even after your site or app is public, you can still experiment and improve on the original to make it even better.
Looking for the perfect UX design?
Work with our talented designers to make it happen.
[ad_2]
Source link